I apologize to everyone that loves to follow this blog!! I know that it has seriously been MONTHS almost even a YEAR!! Well I guess I can post my progress of my quilt up on here. I have been posting a lot in my family blog Perpetual Becoming and if your interested on visiting there you are welcome to.
This year has been crazy with a lot of at home projects Guess I can post those up here too and a lot of changes around here. We are expecting our second baby in this home a little Girl Beginnig September. I have been focusing on organizing many many home files with video and pictures. That's going really well actually. I have been trying to catch up with my family blog and my biggest goal right now:
Finishing our family quilt by September 27
It is a queen and I was deadset on having it be centered around the block patern "drunkards path" k it's pretty doesn't mean we represent that!! I'll post pictures.. This beast, I've been working on since almost 4 1/2 years ago. But I finally applied myself and now have an end date. I have been making awesome progress. You'll see progress soon enough!!! As of for this year I will not start another project until this quilt is done so if I finish by then I get to go to the Utah SCRAPBOOK FESTIVAL.
NOw guess what new project I'll have for the year 2013!!! I am so excited to continue scrapbooking especially since I have not worked on it at all for this year. My poor desk has gathered some dust bunnies. Hope to see you during holidays but mostly in 2013. Take care fellow followers!
Tuesday, July 17, 2012
Friday, November 18, 2011
Muffin Tin Advent Calendar 2nd year
 Hey all you!! Christmas is coming around and we are excited. Thanksgiving is just around the corner and the crisp air is breezing through. This year is our 2nd holiday opening at Etsy. Last year we had such a success. This year we wanted to pace ourselves and make it much more fun so we are just posting a couple things to make your homes a bit brighter. We went for a Classical Christmas theme this year (one of my favorites)!! These muffin tin advent calendars are specialty to our online store and our family. We hope you are able to try one out give it as a gift or just enjoy it for yourself!! Have a GREAT HOLIDAY SEASON!
Monday, November 7, 2011
Please Remove those Stinky Shoes!!!
In our family we love to Remove Those Shoes!! We have nice carpet and instead of paying all the time to get the floor washed we take off our shoes. Having those kids running around, rolling all over the floor and smearing their little faces on the carpet when you go to tickle them, well honestly whatever you step on outside gets on the bottom of your shoes. Running outside barefoot says it all, your feet turn grey to black within a few steps!! Anyways In our home we like to remove shoes and we ask all of our visitors to do so. Yeah we've had some difficulties with some visitors with forgetfullness and so on so we decided to put it nicely on a wood sign and this is what we got!!
Our home has red accents so we decided to attach it to our regular wreath on our front door. My husband cut out the wood I believe it is about 12x7 inch. My husband added a bit of design around the edges but you don't have to. Then I cut out with my cricut Please Remove Your Shoes and an adorable quote I found online. There are so many different ways to make something similar hopefully though it gave you and idea to keep those pesky shoes off of your clean carpet!! Have a great Day!!
Thursday, October 27, 2011
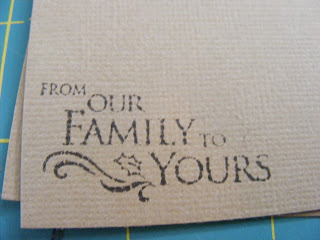
From Our Family to Yours card using cricut and stamp.
My husband and I wanted to make cards to hand out to families we visit each month and we decided to make cookies for them and cards to go along with them. This is what we came out with. They are tags yet one sided cards that we can attach to the top of the cookies. If your intersted in visiting a family or just want to make some nice cards this is a kind idea!
Cut out your base cardstock 3 1/2" by 4" I cut all of my paper first then assemble them as I go!
Next I used my cricut and cut the picture shown at about 2 1/2" remember your cricut will always turn the cut out horizontally!!
You add the magic touch by dabbing ink around your paper. I always use a walnut brown to give it the rustic look!
You will cut a darker brown piece at 4" x 1 1/2" to let it stretch across your card
Take out your cuttlebug. You need to cut a strip of yellow atleast 1/4" smaller than the dark brown strip. I have 2 different sizes shown on the left because I used scraps and cut them down from there after embossing them.
Using your brown ribbon, cut atleast 1/4" longer than your strip of paper.
I tape the excess around the bottom using your glue stick, tape, or any adhesive you have around.
Then you cut a piece of brown ribbon a bit smaller than the piece you used around the yellow strip and tie it under the taped ribbon. Cut off any excess
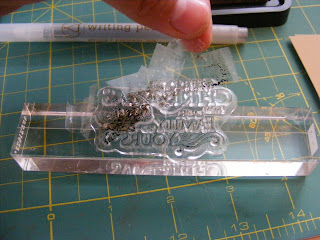
Stamping with any phrase.
I absolutely love this technique mostly because you don't have to just stick to one phrase everytime. You can change it up by using only a portion of your stamp, now that is worth every stamp!!
1. Take a phrase you like, I love the text but it's not Christmas just yet but no biggie!2. grab that tape, any tape will work I only had clear tape ... sorry!! Go ahead and cover the section of the phrase off by taping over it, make your you cover every little bit you don't want!!
3. Take your ink, I use walnut brown and dab it onto your stamp but hold on before you stamp it on your sheet of paper...!!!
Step 4....
Go ahead and peel that tape off!
Now you can stamp. the first time you do this technique you may want to try on a scrap of paper. I always try on a scrap just to make your you don't have any additional pieces you don't want in there. now try to pull that tape of in one bunch so you can just stick it right back on and dip it back into your ink!
Ok so go ahead and assemble your card by attacking your dark brown strip, then the yellow strip. I originally wasn't goin to put a piece of tan under the cutout but I thought it needed something different to seperate the brown strip and the brown cutout. I cut the tan piece about 1/4"-1/2" larger than the cutout.
I printed out this message from the ensign I believe it was the August edition if anyone is curious. Then just attach to your treat, or just take it right over to your friends or family. I hope this was interesting to some and hopefully you use that stamping technique it's a sure one that you'll use over and over again!
Sunday, September 18, 2011
#2~ Making tags using the gypsy.
Hey there so I've made a few videos and just have put off loading them. Hope you like this video I'm sorry I didn't take a picture of it so you can preview it. Things have just been nuts around here getting ready for fall. Believe it or not we do "spring cleaning" in fall. Hope you all enjoy this tag and hopefully make one for a neighbor or friend. Today's video is all over the place so apologies!! Hopefully you enjoy it though.
Monday, August 15, 2011
Close to my heart inspirations
I thought I would show this scrapbook page I recently created for my daughter. It was a really fun page to create and of course it was inspired by other scrapbook creations. Anyways this was all created using my cricut I had such a good time with it. Happy Creations
Wednesday, August 10, 2011
Wedding Creations
Yes I've had a few weddings this summer!! This is the card and the Gift I chose to give the couple.
These where only scraps too!! I hope you all have some time to fish through and find some good stuff in that scrap drawer because if you really think out of the box I"m sure you can find something great to create!
Subscribe to:
Comments (Atom)


